Folding leather? What is the best way to fold leather? Whether you are making a simple wallet or a complicated bag with various pockets etc. you may need to fold your leather rather than cutting and stitching various pieces together.
Yes, leather can be folded. Firstly, dampen the area where you would like to create your fold. Then make a groove in the flesh side of the leather with a V gouge tool. Now fold the leather over and clamp in position until the leather has dried. The leather will remain in its folded position.
Whether it’s folding, bending or creasing leather, let’s take a look at the different methods you can use, as well as the tools you might need, but most importantly why you would actually need to fold leather in the first place.
Why Fold leather.
For leather projects there will be parts or pieces where leather should rather be folded instead of stitched together. Folds create a gentler appearance that are easier on the eye. If done neatly and correctly, will look more elegant and sophisticated compared to stitching. Folding definitely uplifts and improves the look of your leatherwork. It may take a bit of practice, but once mastered, your projects will be much improved. Folding leather reduces the bulkiness of having to stitch 2 or 3 pieces of leather together in order to create a similar effect.
Folding Different types of Leather.
Some leathers are softer and more pliable than others. For instance, chrome tanned leather is usually much softer than veg tan leather due to the chemicals used in the tanning process. So, depending on the thickness it could be folded by dampening it and then clamping it in place for a few hours until its dry and holds its shape.
Veg tanned leather’s foldability will vary depending on its thickness. If the leather is thicker you may need to remove some of it before you can fold it. By gouging out some of the leather on the flesh side you make it thinner and slightly weaker. If you gouge out along a straight line this allows the fold to stay in place once folded, clamped and dried.
Let’s take a look at the most common tools used when folding leather, specifically veg tanned leather.
What tools are needed for folding leather.
You can use the following tools to fold leather:
Bone folder – most of you have never heard of a bone folder before, but it can be used to fold and crease leather. Check out my post on bone folders if you would like to know a bit more about them. They can also be used to burnish leather edges. It’s also used for paper folding and origami.

Steel Ruler – a steel ruler is always handy as it acts as a great guide when making your crease or fold line.
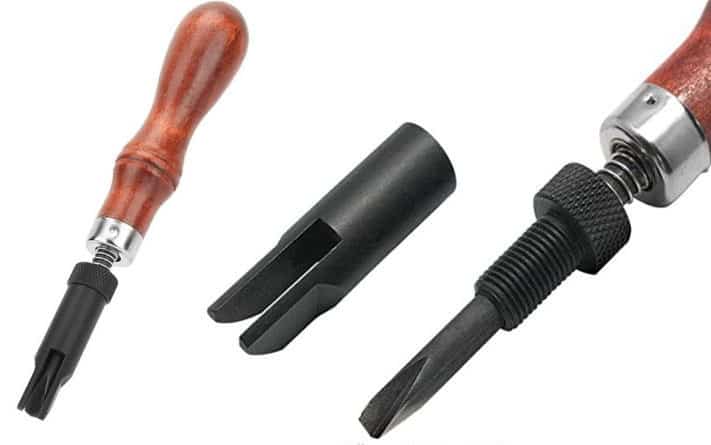
V gouge tool – the best tool for gouging leather as it’s adjustable. You can adjust the depth of the blade in order to gouge different leather thicknesses. Always test your gouge on a spare piece of leather just in case its set too deep. If its set too deep you will gouge right through the leather. You only need to go about half way through the thickness of the leather otherwise it will crack and tear once folded. Here is a link to Amazon for an adjustable V Gouge.
A damp sponge or a spray bottle – fill the spray bottle with water or soak the sponge and use it to dampen the flesh side of the leather all along the crease or fold. The dampness makes the leather softer and more pliable so it’s easier to fold.
Clamps – use clamps once your damp leather has been folded over to hold the leather in place and to keep its shape. Once the leather has dried you can remove the clamps and the leather should stay folded. Something to note: you need to protect the leather from getting damaged by the clamps by using tissue paper or a soft cloth between the clamps and the leather.

How to Fold leather.
Step 1 – take the leather that you wish to fold and cut it out to the required shape and size and lay it so the flesh side is facing up towards you.
Step 2 – Use the steel ruler and line it up where you would like to make your crease or fold. Make sure that you are using the correct side of the leather, the flesh side. You use the flesh side as you do not want to see the crease line once the leather is folded.
Step 3 – Use a scratch awl or bone folder and drag it down the surface of the leather leaving a mark as a guide.
Step 4 – Dampen the area along the crease line that you have just made in your leather.
Step 5 – Use your adjustable V-gouge tool and push it along the crease line being careful not to cut too much of the leather away.
Step 6 – Fold the leather over and use tissue paper over the leather to protect the clamps from damaging the hide. Place the clamps over the leather to help keep it in its folded position.
Step 7 – Allow sufficient time for the leather to dry.
Step 8 – remove the clamps. Your leather should remain in the folded position.
Can you fold thick leather.
Yes, you can fold thick leather. The trick with thicker leather is that your gouge needs to be wide enough so that you can actually fold the leather over. Sometimes the gouge needs to be wider if the leather is really so the leather can actually fold over.
Can faux leather be folded.
Faux leather isn’t real leather, but plastic. Faux leather is also usually thinner and the fold will crack and peel and the surface will deteriorate quite quickly. So, in summary it’s best not to try to fold faux leather.
Conclusion.
Leather can be folded quite easily if you have the correct tools. It is a crucial skill to learn as you will end up folding leather on most projects in leathercraft. Thanks for reading and good luck with your journey in leathercraft.